Image Optimization
There are many different factors that are considered when indexing and ranking a website. Ignore what you’ve heard about the “200 ranking factors” because there are so many different variations of those that the number should be more along the lines of 10,000.
Crazy, right? Well, thanks to universal search results, a webpage can rank for many different elements if they are coded properly. What do I mean by this? It’s simple. If Google knows what it’s looking at, and likes what it sees, it will display that information accordingly if it is related to a searcher’s query.
Since there are a few different ways to appear for a query, I’d like to spend today focusing on just one of those elements. The focus, images.
One of the unsung heroes of web optimization are images. Often times you’ll see that images are not named properly or stuffed with keywords in an attempt to game the system. This drives me crazy and you should be annoyed too so in this post, I will walk you through the steps necessary to fully optimize your image.
Correct Image File Names
One of the most important aspects of optimizing an image is its name. Imagine meeting me at a conference or randomly on the street. Wouldn’t it be easier to read a name tag or remember a name that said joe-rega rather than 00047jfqb.jpg? The same logic applies to images. If a search engine can’t discern what it’s looking at by its (file) name, you are losing out on a ranking opportunity.
Proper image file names should be separated by a hyphen ( – ) and describe what is happening in the image. It’s OK to use keywords here, but should be really only be used if they pertain to the image.
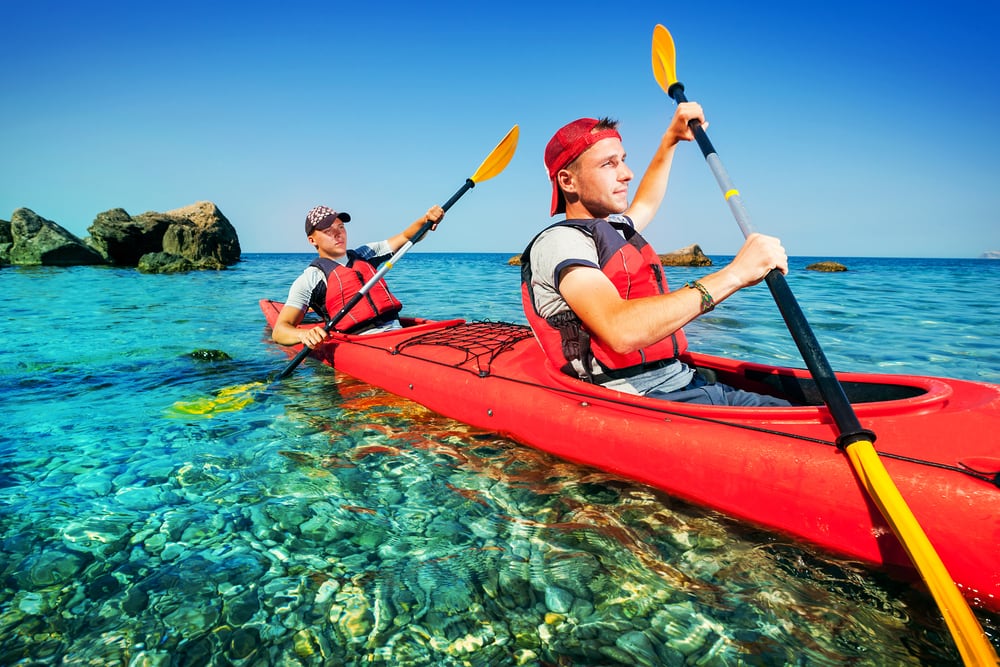
Take the image below for example. The file name here is two-guys-rowing-double-kayak.jpg. It clearly describes what the image is about without stuffing keywords related to image optimization and SEO.
There is also something to be said about the type of file you should be working with.
Choosing The Right Image File Type
Web images are different than print images. The reason here is that when working with print, one file type typically works since you’re only printing it once, essentially, and it will look the same in all magazines or newspapers or wherever it will be published.
Working with web images is a little different. Here we need to consider browser compatibility, internet connection, screen size and resolution. A key point to understand with images is DPI. This refers to Dots Per Inch and is a way of measuring the quality of images. The more dots there are in a square inch, the higher quality the image will be.
When it comes time to save the images we’re working with, there are two main ways to save them so we can publish it on a web page: Vector Graphics or Raster Graphics. Both have their own respective places on the web so I’ll break down how each should ideally be used.
|
|
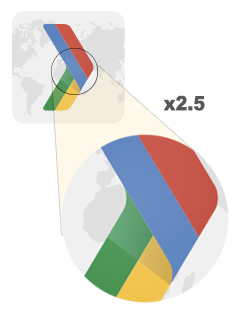
Vector Images
Vector images are the product of using programs such as Adobe Illustrator and are ideal for creating company logos, fonts and calls to action on a webpage. Since they use lines, points and polygons to create an image, this format works best on simple images that can then be displayed on a high resolution screen.
Vector images can be resized indefinitely without losing their resolution. This makes them ideal for working with basic colors that are not too complex.
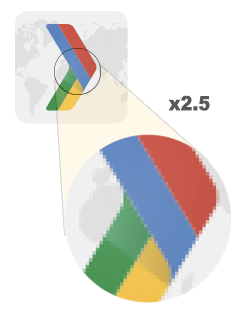
Raster Images
Raster images on the other hand work perfectly with pictures since they can handle the complexity of various colors displayed. The drawback here is that they cannot be resized too frequently as their quality will suffer. See the image above of the raster image enlarged when compared to the vector image.
Since raster images are created using grids, re-sizing them will cause the image to become pixelated and will appear distorted. However, it’s this grid system that allows this file type to handle the complexity that vector images cannot. I know, sometimes life just isn’t fair.
A common, and poor practice (I keep seeing) is to re-size images regardless of their original size. What do I mean? We’ve all seen it. When we go to a website and a small image takes forever to load. Unless you’re using dial-up, this means that the webmaster had taken a larger image and stuffed it into the designated area without resigning it before uploading it. So now this creates a bad user experience since visitors now have to wait longer for a smaller, uncompressed image.
This means that larger images will take longer to load if shrunken down and smaller images will be distorted if enlarged. I’ll touch upon that more a little later.
Once we have decided on the file we’re going to use, the next step is choosing how it’s going to be saved. Keeping in mind that the quality and resolution are important, we’ll need to save our images carefully.
If you use a program like Adobe Photoshop, there is an option to save for the web. Here we can choose the extension of the image that will displayed: jpg, jpeg, png, gif, etc.
Be careful of the format you select as a .png image supports more colors but with that also comes a larger file size. If you decide to go with a larger image file, make sure that the image is adjusted to the lowest file size, but still maintains it’s quality.
Image Alt Text
Staying on the topic of names, an image’s alt text can be another area of opportunity. Again, this is often overlooked and misused similar to image names.
Image alt text is text is used to tell search engines what an image is about. Not only is the beneficial to search engines by it’s also used by screen readers that rely on this information for the visually impaired.
It’s one thing when an image is missing alt text, maybe the developer didn’t know it was necessary or it was overlooked in the final QC before launch. I can completely understand that. But what drives me nuts is when I see keywords stuffed into images like it was the meta keyword tag of yesteryear.
Best practice here is to again, name what’s happening in the image and use keywords only if they pertain to what’s being portrayed.

When I’m not fixing websites and have some free time I like to play bass. Above is a screen shot of some source code showing what the alt text of an image looks like on an electric upright bass (and if my wife is reading that would make a great birthday gift).
Image Title Tags
Similar to alt text, an image’s title tag generally contains the same information however, this information is only displayed when a user rolls over that image.
This can be used to explain what is going on in an image or tell a user next steps, if it is part of a sequential pattern on a site.
Although its been said this is not a strong signal for Google, the best practice here is to avoid stuffing keywords and just write what the image is about.

Image Captions
If you have ever seen an image with text directly underneath it, that is called a caption. This is another area of opportunity to explain what is happening in an image or how it ties into your pages content.
From here we can link out to the source of the image, and include brief summary of text. This is a common practice on Wikipedia…………..
Image Size
Size matters. There, I said it. Since a websites load time is an important factor to consider, (one of the 10,000 we are optimizing for) the size of an image can be a huge factor working for or against us.
Make sure your images are compressed and load quickly. If they need to be large images, consider using a content delivery network to host them to save on bandwidth.
Image Sitemaps
If we want to ensure all of the images on our site are indexed, the best way to do this is to use an image sitemap.
Similar to an XML sitemap for ULRs, image sitemaps create a list of all images on the site making it easy for search engines to find and index. The information needed to create an image sitemap is
- The type of image
- Whether it’s a jpg, jpeg, png, gif, etc.
- subject matter
- What is the image about?
- Caption
- Does the image have a caption? If so, include it here.
- Title
- Add the title of the imge
- Geographic Location
- Was the image taken in London under Big Ben? Include <image:geo_location>London, England</image:geo_location> there.
- License
- Was the image purchased from a stock photo site? Include licensing info here
Content Delivery Network (CDN)
If you are responsible for optimizing a website that uses a lot of images, you may want to consider using a content delivery network or CDN. A CDN will host images offsite on another server so it won’t weight to heavily on yours.
Flickr is a good example of where we can store images on another website and display them on ours.
We are starting to see this a lot more lately and I believe it will escalate in 2015.
Image Placement
Another important aspect to consider is where the image will be on the web page. by using Google’s Browser Size tool (now in Google Analytics) we can see how to our content is aligned to different browser sizes.
This also is important when considering a users screen size and resolution.
Since images are an important marketing tool, be creative in how you use them to market your content.
Conclusion
Images are an important part of the optimization process and are often under-optimized or optimized incorrectly. I hope that you take away from this post new and insightful ways to rank your websites content.
Below are some additional resources to help you with this process:
Google PageSpeed Insights:
https://developers.google.com/speed/docs/insights/OptimizeImages
Website Testing Tools:
Google Image Optimization:
https://www.beanstalk-inc.com/blog/2012/11/01/google-image-optimization-part-1/